Showing posts with label Shasta Compact. Show all posts

Friday, June 13, 2014

Meanwhile Back at the Ranch

To say it's been a busy spring is an understatement. We bought a house, sold a house, moved into an apartment, had massive water damage, had to deal with an insurance settlement, and had to get a construction loan. We should be able to close on the construction loan today or Monday and are on the brink of actually starting work.
In the meantime I get to keep mowing the new yard. It is big enough we got a nice commercial mower so every weekend won't just be mowing.
 
The interior of the house is empty and very rough at this point. The kitchen cabinets have been removed will soon be sent for powder coating.

 The trailer project went on a bit of a hiatus this spring and is now back on track. The table is in an mounted.

It drops down to make the bed. We got a pretty slick removable hinge and folding leg setup from vintage trailer supply that made life much easier.

Insulating is underway in preparation for skin.

Sunday, December 29, 2013

Shastoration Sunday

The trailer project continues. I took some time off this week and made some good progress. We ordered the aluminum skin from California and it showed up in three big boxes. It's not ready for skin just yet, but we have it sitting on the shelf. The house and trailer wiring are finally finished.
 
The electrical cabinet contains three fuse panels and one inverter charger. In total there are four AC circuits and five DC circuits.
 
 And there was light. All of the lights are DC LEDs so they draw very little power.  

I replaced the standard bulbs in the main house light with LEDs and rewired the original kitchen light for two LEDs also. Although not shown in the picture, we saved the original 1960's glass sconce for the kitchen light. You can just see the remote battery monitoring panel mounted on the front of the fuse door there in the closet. I picked up a cheap car battery to test out the systems. Eventually we will get use a sealed AGM type for camping.
 
Most importantly, the refrigerator works. So now when the world ends and we have to pull it into the middle of nowhere, the beer will be cold.
The next step is to trim and insulate. Since we will be using lots of spray foam for insulation, the interior trim will need to be completed so nothing leaks in or deforms the panels.

Monday, November 4, 2013

1965 Shasta Compact Project: November Update

After months of wiring, the trailer is getting to a point where we will be making some visible progress soon. In case you forgot, this is what the profile looks like.

The wiring in and distribution out all come from this side. The wiring doesn't take that long, but the drilling and fishing the wires through the aluminum tube takes forever. Grommets have to be fitted and glue into place everywhere the wires run through the frame so they don't short from vibration.

The frig is installed. The one we wanted, and built the cabinet for, was out of stock indefinitely, so a little modification was needed to get the larger model in. The wall was cut out and one of the front structural member was removed and needs to be relocated. 
 
From the front the fig fits like we meant it. The original plan was to have some walnut trim around the refrigerator. As you can see, this model completely filled the space.

Not a ton of progress here other than a couple reading lights in place. After wiring is complete and tested, we move on to trim before spray foam and skin.

Funny, the past 6 months have been spent pulling wires to and from this cabinet. A few dozen more connections and I can close this up. 
Keep in mind this trailer is 12ft long tongue to bumper. For power we have a 30 amp shore service, 2 90 watt solar panels, and 200 mAh of sealed batteries running to a 1200 watt inverter charger. That powers 5 AC outlets, a TV, and LED base lighting, and on the DC side, 2 outlets, a refrigerator, 2 reading lights, 1 main house light, a kitchen light, and an automatic fan. That is more power than you would find in an airstream 3 times as big. 

Thursday, August 1, 2013

Shastoration Thursday - Mood Lighting

The electrical wiring on the trailer is in full swing. Most of it is probably pretty boring unless you are an electrical engineer or need to ride out the zombie apocalypse. One thing important in the apocalypse is to have low draw, dimming lights. I mounted remote controlled LEDs at the very bottom of the benches. When they are off you can hardly tell anything is there. There are pretty cool and can do a full range of colors and brightness. At night it will be nice to turn the lights down and relax.
 
 Or you can do a disco dance party with flashing lights.
 
The benches have been trimmed in 1/2 inch aluminum angle.

And wiring continues.


Tuesday, April 2, 2013

Anybody There?

Yeah, yeah, yeah, not much going on here. Spring has sprung and the yard is starting to look green. Garden preparations are well underway and the garage and hoop houses are full of seedlings. It has been cold and snowy so not much has happened with house projects. It also seems that any intention I have of working on the trailer is foiled by a growing little boy and his refusal to sleep or let mom have any sleep. Even so, there has been a tiny bit of progress lately.
The upper cabinets are hung. I took the afternoon off on my birthday and hung cabinets. Funny what passes for relaxing activities these days. This cabinet over the kitchen counter will have sliding doors.
 
The other cabinet over the curb side bench will have a top hinged door. This upper cabinet will hold the stereo.

The bench framing has been completed. These will have hinged tops for storage and be skinned with walnut plywood too. The other recentish activities have included installing the shelf framing in the closet.  
As I have been saying for months now, I'm a few hours of work away from starting electrical. 

Thursday, September 6, 2012

Google Really Loves the Shasta

I was looking for a location on Google maps today and ended up going over our house. The last fly over was about a year ago when we had the trailer sitting in the driveway.

And they even took a look from streetview.

Saturday, September 1, 2012

Shastoration Saturday

Hurricane Issac brought us some much needed rain, which let me get some more trailer work finished. I installed a few more body supports and interior skin and managed to get some painting completed in preparation for the kitchen cabinets. The lower kitchen cabinet is installed. Laminate showed up this week so we can get the top finished and get the sink in. After some looking and debating we ended up sticking with the original sink. It is in really good shape and will be one of the few original pieces.
 
For laminate we went with Arborite textured light blue.
 
The drawer pulls are reproductions of the original style from rejuvenation.
This is probably one of the last views from outside. After the closet is installed I can button it up.


Monday, August 27, 2012

Mid-Century Happenings

Hey, how about a post that doesn't involve the garden? It is hard to believe that summer is over, school has started, and we are two months away from having six thumbs in the house. A couple people mentioned that a bassinet worked well for them at least for the first few months. I looked on-line and anything cool is at least $1000. I am not spending $1000 for a couple months use and then have something I have to store for the foreseeable future. So I decided to build a mid-century inspired bassinet that folds flat. It isn't finished but you get the general idea.

The pieces are 1/2 inch Baltic birch and go together like a cereal box toy with tabs into slots. There is no hardware, screws, or fasteners. The base is designed to accept a standard changing pad.

It took a little head scratching to get everything in the correct location. I definitely got a workout on the jigsaw cutting all those slots.
 I will end up painting a couple sides and clear coating the rest. I even put a couple mid-century details on it, because clearly the baby will care. Should be finished this weekend with plenty of time for the cats to lay claim. Boy are they in for a surprise.
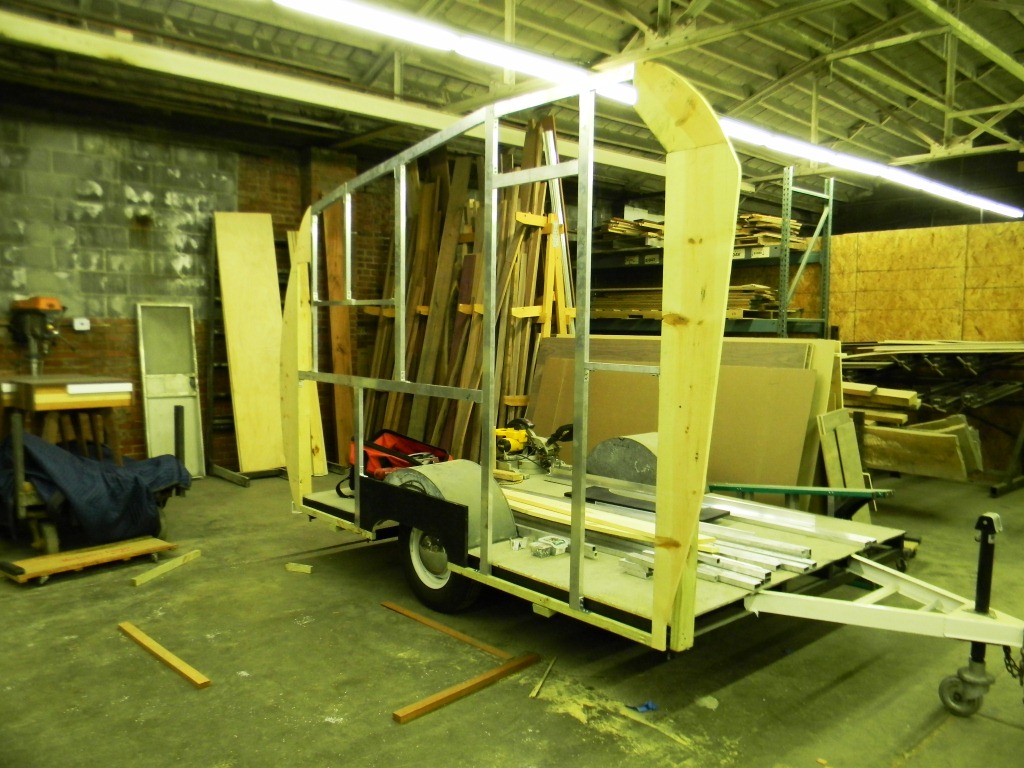
 I would call this mid-century progress, but since the entire trailer is new I guess it is also mid-century inspired. We have a front window opening.
 
The low VOC, sustainable, environmentally friendly save the planet marmoleum came. I'm sure the company loved me, I ordered the minimum amount possible which turns out is just the perfect size for a trailer. Here it is all laid out for trimming.
 
 The color is a textured gray. The one big sheet should make for easy cleanup.

I bought a low VOC, LEED compliant adhesive to glue it down. You spread this stuff out and then wait for it to dry and get tacky. What they don't tell you is that the VOCs make the original stuff get dry fast. I spent a good portion of Saturday watching glue dry.
 The finished floor. Since the plywood underlayment was painted about the same color grey, there isn't much of a difference in the pictures. The paint cans are holding down a problem spot.
 The kitchen cabinet is almost ready to install. Here it is with the doors just sitting in place for effect. The water tank is on the bottom and will get covered with a set of dummy doors. It's about time to order the frig and get this installed.

Thursday, August 2, 2012

Long overdue trailer updates

I started this post and then completely forgot about it, so here is a delayed trailer post. The shop is very hot (95-100) right now so I haven't had much motivation to go work. Anyway, the aluminum is just about finished. The front braces are in along with the back window framing. I have started installing the horizontal wood pieces for skin support around the curves too. It is already pretty stiff.

The fan framing has been installed. This is a pretty neat little unit. It is motorized with temperature sensors and a moisture sensor that will automatically close the vent if it rains. Now we just need an interior.

Jerad and StudioBuild are building the cabinets for us. Here is the basic frame. The left bay will be a hinged door. The middle bay will have three pull out drawers. The right bay is for the refrigerator. The slant will follow the front angle. Our water tank is going to fit under this as well. It will be tight.
Flooring is ordered, plywood for the roof is at the shop. It will start coming together soon.

Sunday, June 24, 2012

Shastoration Sunday

It was a big, hot weekend of work on the trailer. Saturday afternoon I managed to finish putting the plywood on the second wall. Today we got the wall in place and,

got a least a few supports in. We need to get the front and back window supports, back support for the solar panels, and supports for the vent installed yet. The plan is to get the cabinets, closet, and benches installed before entirely closing it in. 

Hey, at least we got to a point where people will stop asking "what's is going to be?"

Sunday, June 17, 2012

Shastoration Sunday

So far summer has been very busy with work, parties, and weddings. Having the trailer stored elsewhere is nice because it gives us space to work. However, it is easy to ignore, out of site, out of mind is true. This weekend we finished construction on the wall framing, finally.

After going back and forth on assembly order, we decided to install the interior before the aluminum skin. I fit 1/4 inch plywood to the frame and attached it with rivets. The interior will be white so the rather pinkish plywood won't matter. 

I think the three partial plywood sheets doubled the weight of this wall. 

We can hopefully get the other wall finished this week and get them installed next weekend. 

Sunday, April 29, 2012

Shastoration Sunday

This weekend was a big work weekend on the trailer. Next Friday is first Fridays and the shop will be open so we wanted something to show off.

My structural engineer provided shop drawings with a fairly large radius for the rear portion. I had to be creative to get it laid out. The pencil on a string approach seemed to work.
 Sam dictated sizes and doubled-checked cuts while we laid out the wall on the floor. It was nice to have a big space to lay everything out.


We picked up a couple pieces of angle to cut and make connections. Sam cleaned up the burrs and drilled pilot holes while I cut the big pieces.
 Little by little one half came together.


The end pieces were glued and pocket screwed together. It took about 8 hours to get one wall completed and my back and knees are pretty sore from bending over. I may take the next weekend off to recover.